The drain plug is right on the bottom of the air box.
Draining Your Air Box
Pokie, February 2002
This is a piece of service work that is not only easy to perform but your bike will appreciate it each time you do it. If you carry out this job each time before you wash your bike, you will never experience the good it does. After all isn’t that why it’s called preventative maintenance?
One of the bikes anti pollution devises is introducing its crankcase breather exhaust into the intake tract instead of the atmosphere. This breather exhaust (after being sucked and blown about inside the engine) has both oil and water vapor in it. The oil and water charged air, is then introduced into the intake tract with the intention of being burned up in the combustion chamber. The idea is good and for the most part works fairly well but while this is going on, liquidized vapor still collects in the air box. As this liquidized vapor puddles up in the bottom of the air box, the bike starts to run poorly and may even develop a stutter, miss-fire and/ or rough idle.
The only way to deal with that liquidized vapor is to manually remove it. The method to get said goop out is simple but a little messy. That’s my reason for doing the job before giving the bike a bath. In preparation to drain the air box (knowing how messy it can be) have a few rags at the ready and slip on a pair of nitrile gloves. Nitrile gloves are a good idea as the oil and gas mix found in the air box will be contaminated with carcinogens.
|
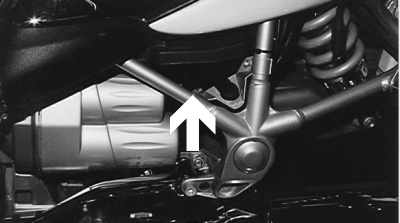
The drain plug is right on the bottom of the air box. |
First thing to find out is where the air box drain plug is located. Looking at the left-hand side of the bike, the air box is that black lump under (and behind) the colored trim panel under the seat. The drain plug is right on the bottom of said air box. To access the drain plug, you’ll have to stick your hand between the frame (just ahead of the swing arm pivot) and the starter motor cover. The drain plug is that little black cap that kind of looks like the oil filler cap on the rocker cover (except upside down).
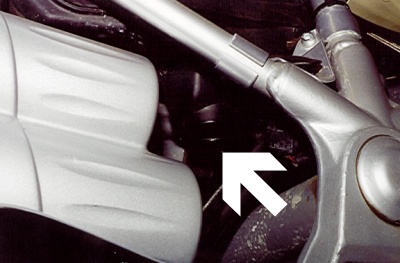 |
A look from the bottom. |
With the drain plug located, try to place an oil pan or a couple of sheets of newspaper somewhere below it. Why I say somewhere is because the likelihood of the oil drips going straight to the pan without hitting something else in between is pretty slim.
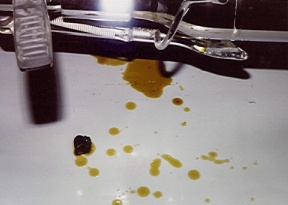 |
A little goes a long way. |
When all is ready, reach in and turn the plastic drain plug (counter clockwise) one-quarter turn and lift it away. If any oil has collected in the air box (pretty likely), it will now be running down and dripping off your fingers and (hopefully) into the well-placed pan. Just getting the bulk of the goop out of the air box will make a difference to the bikes running, if time allows, I will to let it drip over night.
After the dripping stops, wipe down the drain plug and the bottom of the air box. Check that the rubber o-ring is still attached to the air box hole, additionally, check the condition of the rubber o-ring. The o-ring is constantly being exposed to gas and oil vapor so it may become hard and brittle before long (couple of years). Once the condition of the o-ring has been established (as well as the fact that it’s even there), the drain plug can be put back in. To secure the drain plug, simply turn it one-quarter turn (clockwise) to its stop.
A little messy but yet another job you and your bike can benefit from.
Copyright © 2009 Pokie Parmidge