
Removing the Charcoal Canister
June 28 2007
For whatever reason, you may have need to remove your charcoal canister. I needed to remove mine because of contamination (it was oozing gas from the breather and puddling on the floor). This is the way I removed mine.
I started by removing the seat, both chrome side panels as well as the two color panels under the seat.
|
The canister exposed. |
In the photo above, the charcoal canister is the black plastic cylinder, the lump just ahead and below the canister with the tubes and wires is the canister selonoid.
To get the unit out, I first had to unplug the wire connector to the selonoid by pressing in the metal spring clip and wiggling the plug off.
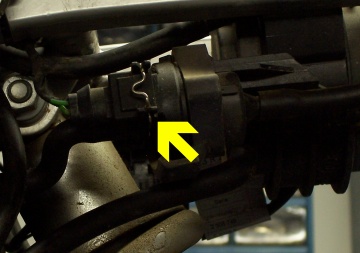 |
Press in on the spring clip and wiggle the connector off. |
I then unplugged both hoses leading to the selonoid (front and rear). Located the hose that leads to the ground from the canister and pulled it up and through and allowed it to dangle from the canister. Traced the hose that runs from the back of the canister to the plastic hose barb just behind the gas tank and removed the hose at the hose barb, keeping the hose barb for re-use.
Under the frame, on each side of the canister is a plastic clip that holds the canister on the frame. These two clips need to be pressed together to free the canister. To get the canister out of the frame, I tilted it so the back of the canister was pointing up.
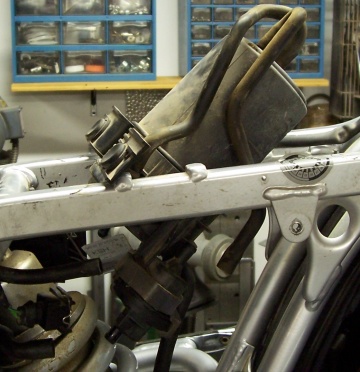 |
The canister tilted up, ready to come out of the frame. |
Once the canister was tilted up, I simply rotated the canister counter clockwise (to allow the selonoid to clear the frame tube) and lifted the unit out.
In the process of tilting and rotating the canister, the final tube (a little short kinked one) will come unplugged from the air box. This kinked tube will likely stay attached to the air box. At the time, I just removed it from the air box and set it aside.
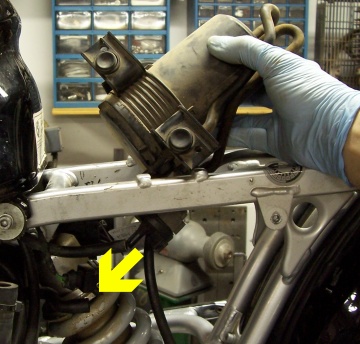 |
Lifting out
the canister. The arrow shows the kinked hose to the airbox. |
With the canister and kinked hose removed, the air box will now have a leak. I was able to find a little plastic cap that was a good, snug fit over the hose barb leading into the air box. I would think pretty much anything could plug the hole though, like a dob of silicone seal or a bolt stuck into the kinked hose and re-fit to the air box, like I said, anything to plug the leak.
 |
The yellow cap I used to plug the leak in the air box. |
Things I removed from the canister for re-use; the hose barb for connecting to the gas tank breather, the hose that ran from the canister to the ground and the selonoid switch.
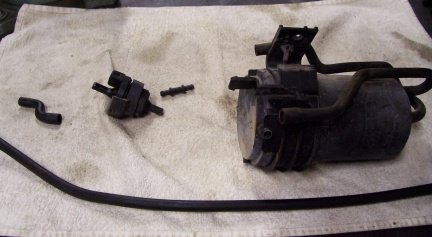 |
The canister and it's parts layed out on the bench. |
I took the hose that ran from the canister to the ground (the bottom hose in the photo above), wiped down the hose and poked the hose barb into the small end. The hose barb was then plugged back into the hose that runs from the back of the tank. I then followed the same fitting of the hose to run it to the ground. The hose ended up way too long, so I snipped it off about even with the other hoses that hang down below the bike.
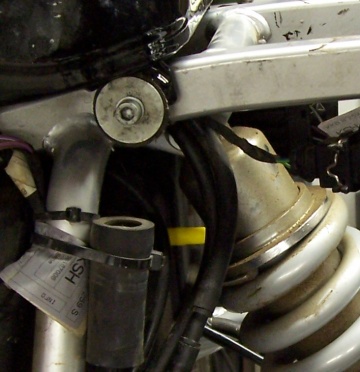
I then took the selonoid, plugged the wire plug back into it and attached it to the frame with a zip tie. It's important that the selonoid be put back even though it does nothing as the engine managment will detect it missing and switch to running in default mode. I also found some rubber caps to put on the two ends of the selonoid but they really aren't necessary.
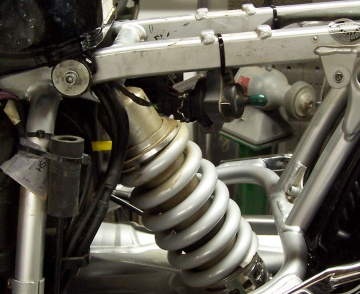 |
The capped off selonoid strapped to the frame. |
After strapping and capping the selonoid switch, the bike was ready to go back together.
Copyright © 2009 Pokie Parmidge