Fluid Changes
Pokie Parmidge, Feb. 2003
Whether it be front brake, rear brake or clutch, there are some basic things you need to consider before attempting these fluid changes.
This article not intended for use with power assisted brakes!
First and foremost- Brake fluid (used in clutch as well as brakes) is nasty stuff! It's important to read the cautionary portions of the label on a can of brake fluid and understand the first-aid measures. Brake fluid will also damage paint work in short order, so it's important to clean up any drips immediately with soap and water.
Never totally drain the system- It doesn't matter if you are changing the fluid or replacing a major part of the system, never totally drain the system of fluid. When the system is totally drained, air bubbles can collect in areas that are almost impossible to get out. Changing the brake or clutch fluid is like the game of Tug-of-War because both ends must be worked. You must add some fluid, drain some fluid, add some fluid, drain some fluid, never allowing any part to totally drain.
Don't mix fluids- If your system is listed for DOT-4, then use DOT-4. Don't make substitutions or put in something you may feel is better. Often the fluids won't mix but more importantly, the seals in the system will have been designed for a particular grade of fluid. Filling up with the wrong fluid may damage internal parts of the system.
With all that said, here is how I change my fluids:
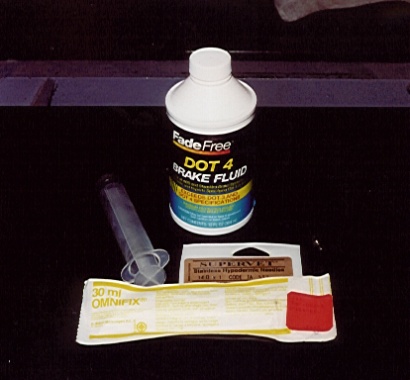
I pick up a can of DOT-4 brake fluid from the local auto parts store (or BMW motorcycle shop), and I stop by the local veterinary supply to pick up a plastic disposable syringe and needle. The syringe (30ml) will be about $1.50 while the needle (14 gage x 1") will cost an additional $2.00. A small box of "Q" tips will also be of value.
|
New bottle of brake fluid and syringe. |
I start off by draping a large rag over everything on the side I'll be working on, including the gas tank (just in case of spills). Whether it's the brake or the clutch that is being done, the reservoir will need to be as level as possible. If working on the front brake mastercylinder, I'll turn the bars to the left, if working on the clutch, to the right. One at a time, so-as not to risk any spills.
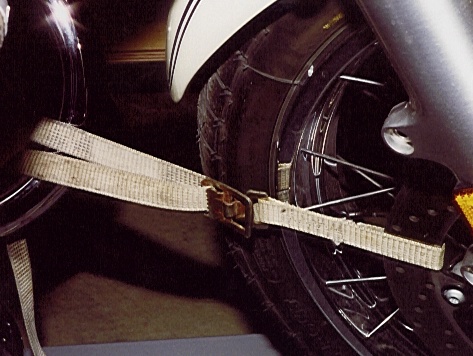 |
I strapped the wheel to the header pipe. Don't do this while its hot! |
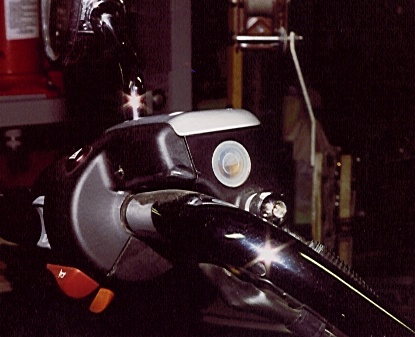
Clutch fluid change- I make sure the bike is as secure as possible in an upright position, turning the handlebars full lock to the right and strapping the front wheel so steering can't be turned by mistake. Clean around the cap so no bits of dirt or road debris fall into the reservoir when the cap comes off. Out come the four screws in the cap and lift the cap away (I'll hold a rag under the cap as it's lifted away to gather any possible drips). Sometimes the cap will be a little reluctant to lift so I just tap the sides of the cap with a soft-faced hammer to loosen it. If the rubber bellows didn't lift off with the cap, note the way it's on then just lift it away as well (again watch those drips).
After the cap is off I'll reach for my Vet syringe. Twist the needle into place and suck out all the brake fluid from the reservoir. When I've gotton as much of the fluid out as I can with the syringe, I'll soak out the remainder with a couple of pinches of toilet tissue. To clean the last bits of fluid and gunk out of the reservoir, I'll reach for a few Q-tips. One swipe with each end of the Q-tip and straight into the garbage it goes. All of the gray glop that collects in the corners of the reservoir has to go. It's not unusual for me to go through four or five double-ended Q-tips to clean a reservoir.
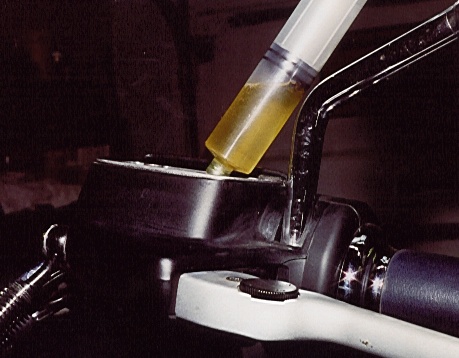 |
Sucking out the old fluid. |
Caution: while the reservoir is empty, DON'T pull on the clutch lever! Accidently pulling the clutch lever will not only cause a squirt of fluid out of the top of the reservoir, but will also introduce an air bubble into the system.
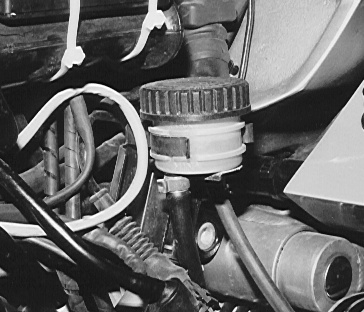
Next you must get to the bleeder for the clutch. The left-hand chrome panel, seat and left-hand color trim panel will need to come off. The bleeder is on the end of a black tube strapped to the frame member behind the left-hand color trim panel. I cut the tie strap holding the bleeder tube in place and slip the tube out where it can be worked with. The bleeder will require two wrenches: an 8mm as well as a 10mm. I use box-end wrenches for this job so they will stay in place. Attach an old piece of tube to the bleeder so the fluid can be pumped straight into a bottle or pan.
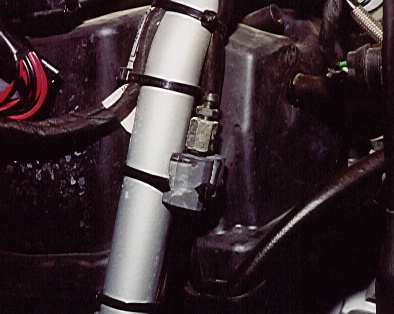 |
The clutch bleeder. |
Because the bleeder will use both hands, this is where I'll either ask for help or use a vacuum pump. I actually prefer the squeeze and squirt method, so this is where I'll either get my daughter, wife or neighbor to give me a hand. I'll get them to do the squeeze portion so they won't get dirty. I'll also explain, when I say "squeeze" just squeeze the handle as far as it will go, keep the pressure on until I say "release". That's usually enough explanation to move forward. Fill the reservoir and set the top back on (fluid will squirt out the top from time to time so keep it covered.) Then, as I loosen the bleeder I'll say "squeeze." When their lever compresses to the handlebar, I'll tighten the bleeder and then say "release." This needs to be done several times, every three or four squeezes I'll check and top-up the reservoir. When clean fluid starts to come out of the bleeder, that's the sign that the job is done.
Tighten the bleeder, remove the hose, wipe off the bleeder and strap it back to the frame. Top up the reservoir, wipe down the cap and bellows and re-fit. Snug down the screws (using a cross pattern), re-fit the trim panel, seat and chrome cover and that job is done.
 |
The reservoir topped up. |
Front brake- Why I choose to do the front brake next is everything is basically the same as dealing with the clutch. To keep the reservoir as level as possible, I'll turn the forks full-lock to the left and strap the wheel so the forks can't be turned while I'm working on the bike. Same as above with the reservoir: clean, remove the top and bellows, suck it out then mop it clean.
With a good fitting piece of hose and an 11mm box-end wrench, I can usually do the squeeze and squirt method by myself. Still, the same steps apply. Fill the reservoir, set the cap on, squeeze and squirt a few times then check the level. Bleeding will have to be done on each calliper as each side is separate. When clean fluid starts to come out, the job is done. Wipe everything down, top up and re-assemble. Before putting the dust covers back on the bleeders, I'll check the covers for cracks or damage. If the dust covers are damaged I'll replace them to keep filth out of the bleeders.
| Just a note here on bleeding the front or rear brakes. People keep asking me if they should remove their gas tank and bleed the ABS units. My answer is no. The only time these bleeders are messed with is when there is a severe problem with the system or a major part of the system has been replaced. If you have made the mistake of totally draining your system of fluid, bleeding at the ABS units might be necessary but not always required. |
Rear brakes- This is the easy one. To access the rear brake reservoir, the right-hand chrome panel below the gas tank will have to come off. The process for changing the fluid in the rear brakes is the same as for the clutch or the front brakes with the added feature of not having to worry about the master cylinder squirting back. Suck out the old fluid, wipe out the reservoir, fill the reservoir with new fluid, squeeze and squirt, top up and it's done.
 |
Rear brake reservoir, behind the chrome cover. |
To make fluid changes even easier, try "Speed Bleeders." Speed Bleeders replace your old bleeders but have one way valves built into them so you don't have to have help bleeding your brakes. They have yet to make a Speed Bleeder for the clutch but maybe some day soon. Speed Bleeders are available direct from the manufacturer or from your dealer.
Copyright © 2009 Pokie Parmidge