Fitting a New Fuel Filter
(Hopefully, before you need it.)
Pokie December 2002
Putting in a new fuel filter isn't one of my favorite jobs, I would sooner visit the dentist! BMW suggests the filter be replaced every 24,000 miles under normal conditions or 12,000 miles under dirty or questionable conditions. A warning here, I have had to rescue a couple of people that felt they could get more mileage out of their fuel filter. If your tank has to come off for any reason and it's been at least 15,000 miles since your fuel filter has been changed, invest a few extra bucks and have it changed. The peace of mind it buys just knowing you have a new filter is worth the cost.
The fuel filter in our bikes is there to protect the injectors from being damaged by contaminants in the fuel. The fuel filter's mesh is so fine that water will plug it completely! The usual signs that your fuel filter is plugged (or close) is a very noisy fuel pump, a fuel pump that never seems to shut off or a bike that runs for a second or two and then dies. If water contamination is the problem, your bike will start and run for a second or two, produce a cloud of white smoke, and then die.
Changing the fuel filter starts with removing the fuel tank. Of course it's more desirable to remove your fuel tank when it's empty. But if it's not, have a jug large enough to accept what's in your tank on hand. If you aren't quite sure how to remove your tank, please see my article Tank Off.
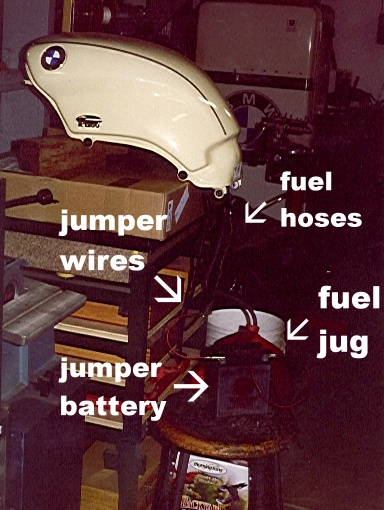
Once your tank is off and sitting on the bench or some other "safe" surface, you need to make sure any remaining gas is pumped out. I use my bike's own fuel pump to pump out the bulk of gas from my tank. I do this by making sure the tank is in a safe and secure position with the fuel hoses feeding into a funnel in the top of a suitably sized fuel storage jug. I either use the battery out of my bike or a 12 volt "jumper" battery that I keep around just for this sort of purpose.
If you'd like to do it my way then, use jumper wires and connect the negative side of the battery to the brown wire of the fuel tank wire harness. Connect the positive side of the battery to the green wire with the white stripe. Your fuel pump will start running. Check to be sure the gas is flowing into the jug and not on the floor or down your leg!
| WARNING: don't walk off expecting the fuel pump to take care of itself. If your tank has a lot of gas in it, give the fuel pump a rest about every minute or so by shutting it off for a few seconds. Your fuel pump also depends on the fuel around it to cool, so, as soon as your pump stops pumping fuel, shut it down! If you start your pump and go off and leave it, when it pumps out all the fuel it can no longer cool itself properly and you risk the pump burning up its motor. |
|
Fuel tank safely positioned and pumping gas out. Keep an eye on both the gas level in the jug as well as whether or not your tank has run out. |
Once the tank has been drained, there will still be a small amount of gas sloshing about inside. Keep that in mind while you set the tank upside down on a clean towel in preparation for removing the pump cover. If the bottom of your tank is dirty, now would be a good time to clean it as it's important not to get any filth in the tank.
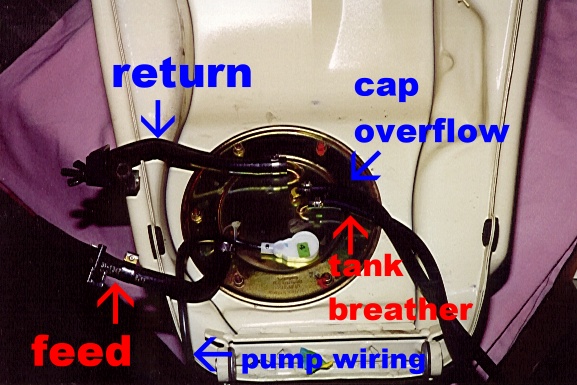 |
After cleaning the bottom of your tank, this is what the pump cover looks like. |
After cleaning the bottom of the tank and before removing the nuts holding down the pump cover, dab a drop of penetrating oil (or just plain oil if that's all you have) on each one of the the cover studs. The hope here is to reduce the possibility of any of the threads binding as the nuts are removed. Before trying to lift the cover, mark both the cover and tank with a paint dot to show the cover's position. Now use an 8mm socket and ratchet to remove all the nuts from the pump cover.
Lift the rear of the pump cover until you can see the pump screen. Tuck the screen back as you lift the cover so that you don't damage it. As you lift the cover up, watch for anything that may hang up on the tank flange. The hoses should be just long enough to remove the whole unit and lay it over onto the bottom of the tank (that's why it must be clean!). Note the flow direction of the old filter (black arrow on the body) as the new one needs to go in the same way.
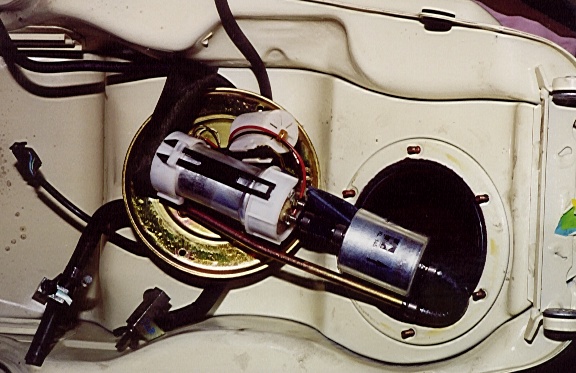 |
The fuel pump and filter open to the world. Note the direction of flow before removing the fuel filter. The other silver tube is the fuel pump, the smaller white plastic tube above the fuel pump is the fuel level indicator. |
With a little bit of care and attention the fuel filter hose clamps can be reused. Carefully poke a screwdriver into the crimp area and pry until the clamp is loose enough to slip the hose off the old filter. After the old filter is out, slip the new filter in it's place (re-check the flow direction). Pinch up the hose clamps with a pair of "end cutters" to tighten the hoses.
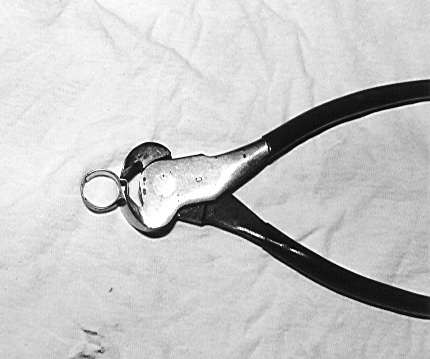 |
Using "end cutters" to tighten up the clamps. |
When the new filter is crimped in, give everything a good look over for any loose hose connections. All hose connections should be tightened up (by pinching the hose clamps.) You don't want to remove the cover again because of a leak! The temptation to put the cover back on now will be very strong but you have to resist, you're not done yet. Shine a flash light into the tank's low point by the filter cover. Is there only a small pool of gas, or is there a small bubble of water in there? If there is any chance that bubble is water, it has to come out! Instead of trying to shake the bubble out of the tank, the method I use is a large disposable syringe procurred from the local veterinary supply. Poke the needle down through the gas and suck out the water bubble below. Repeat as many times as necessary to rid the tank of the remainder of water.
Finish up by wiping down the sealing surface of both the tank and pump plate. Coat the o-ring with a film of oil and carefully slip the whole works back into the tank, tucking in anything that may need a little help along the way. Using the marks or paint dots you applied before taking the cover off, press the cover onto the studs. Check the even fit of the cover by comparing the "stick out" of the studs, it may be necessary the lift the cover slightly and re-position the o-ring. Apply a dab of anti-seize to each one of the studs before threading on the nuts. Thread down each of the nuts until they only just touch the cover. As you snug down the nuts on the cover, use a cross pattern to evenly distribute the pressure on the o-ring. If you feel the nuts should be torqued, BMW suggests a torque of 4 foot pounds.
Turn the tank right side up. A dribble of gas will likely run out the breather line and onto the floor (make sure your foot or pant leg is out of the way). If you still have a bit of gas in the tank, slosh it around to check for leaks.
| WARNING: while the tank was sitting upside down, raw gas has gone down the tank breather line. You must turn the tank to its upright position as soon as you have the pump cover buttoned up. Don't leave it upside down! If you leave the tank upside down for any period of time without allowing the breather hose to drain, the pressure in the tank will rise quickly. Then the dribble of gas left in the breather line will be pushed out with enough pressure to spray out as much as four feet, causing a mess and a fire hazard! |
With your new filter in place, the fuel tank is now ready to go back on. BTW, did you remember to check your battery while the tank is off?
Copyright © 2009 Pokie Parmidge