Swing Arm Replacement
Pokie Parmidge
February 2005
When I noticed my rear swing arm was rejecting it's factory paint by spitting it off in big sheets, I knew it would have to be dealt with before it all turned into so much rust. When I realized my bike still had a smidgen of warranty left on it, I went to my dealer and asked for options. One look and my dealer said, "Let's get you another one shall we?" I was pleased BMW would go for a new swing arm, now I wouldn't have to pay to have my old one powder coated. Just for these pages, I asked if I could put on the new swing arm myself. My dealer had no problem with allowing me to go ahead, after all he had more work than his mechanics knew what to do with. Here's how it all went.
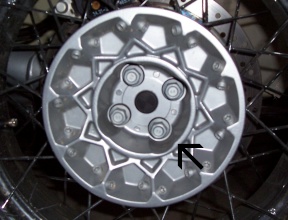
I have a BMW service stand to hold the bike steady and lift the rear wheel, so up went the bike. For a little extra safety, after the bike was on the stand, I tied the stand to the front wheel. First item to come off was the rear wheel, to break the wheel bolts loose I shifted the transmission into first gear. Using a 17mm socket and 1/2 inch breaker bar, I "snapped" the bolts loose in a counter-clockwise direction.
|
Wheel Lug bolts |
To get the rear drive off, the rear brake caliper, ABS sensor and speedo sensor all have to be removed. I found if I just unscrewed the bolts and let the units hang by their wires and hoses, they're just fine. A note of caution here, I made sure to keep track of the shims under the ABS sensor and put them all back on reassembly.
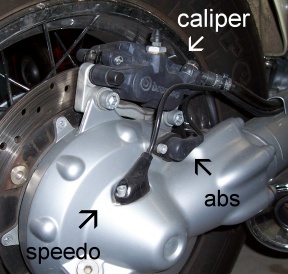 |
The caliper
bolts needed an 8mm hex key. The ABS sensor needed a T25 Torx wrench. The speedo pick-up needed a 4mm hex key. |
This was a good time to take off the trim piece or channel the wires and hoses run through on the swing arm. I used a 10mm socket on a 1/4 inch drive ratchet to remove the two chrome cap nuts holding on the channel.
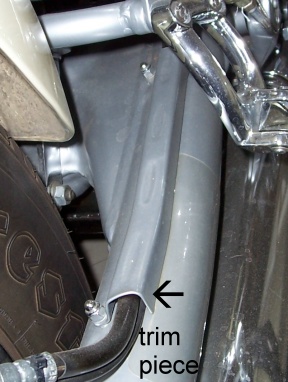 |
The trim piece or channel was held on with two chrome cap nuts. |
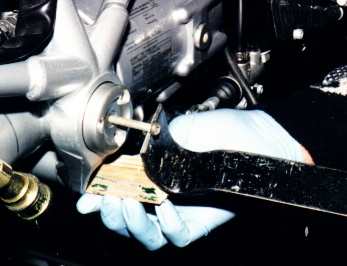
Removing the rear drive at this point just means removing the six 8mm socket head cap bolts with a 6mm hex key. I found the rear drive a little reluctant to come off because of tight fitting bushings. To get the rear drive to come off, I threaded in the top and bottom mounting bolts 4 or 5 threads then tapped them with a soft-faced hammer until the rear drive was free. If when the rear drive is removed any oil comes out of the shaft area, this indicates the pinion seal in the rear drive needs to be replaced. You might think this little bit of oil would help with lubricating the splines but it doesn't, it only helps in washing away the all important grease. Because I didn't drain the oil from the rear drive before removing it, once it was off I had to remind myself to keep it upright so no oil would leak out.
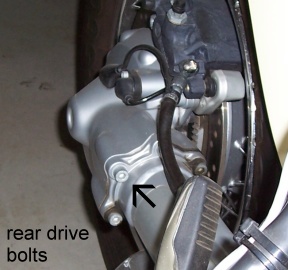 |
The rear drive bolts, all six have to come out. |
Next item off is the swing arm itself. The swing arm pivot on the left side is hidden behind a gray cap that is held in place by an "O" ring around the edge. The way I got this cap out was using a small, bent screwdriver.
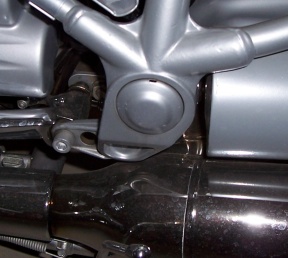 |
Swing arm pivot cover, held on by an "O" ring around the edge. |
Inserting the tip of the bent screwdriver into the slots in the cap and pressing against the frame, I slowly worked the cap out. When I put the cap back into it's hole, I smeared grease on the "O" ring.
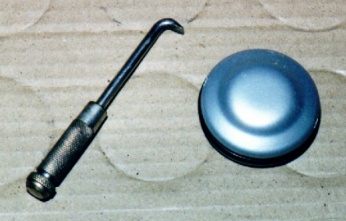 |
Removed cap
and the bent screwdriver I used to remove it. Note the "O" ring around the cap. |
Under the cap is the swing arm pivot and lock nut. The lock nut was loosened using a 30mm socket on a half inch breaker bar. Once the lock nut is loose, the pivot can be turned using a 12mm hex key. With the lock nut loose and the pivot ready to be backed out, I turned my attention to the lower shock mount.
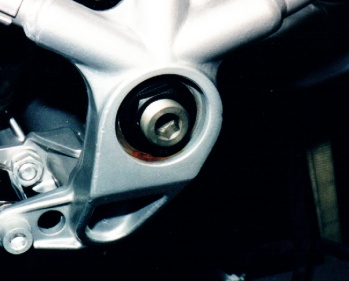 |
The left pivot and lock nut. |
I loosened the lower shock mount using a 14mm socket on the bolt head and a 15mm box end wrench on the nut, again I left the mount in place until I was ready to lift the swing arm away. The last thing that had to be removed before the swing arm would come off was the right side pivot.
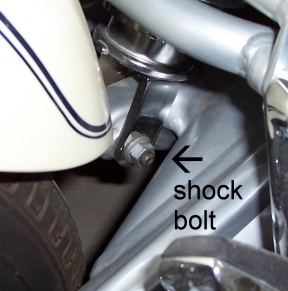 |
The lower shock mounting bolt. |
The right side pivot is a little tricky to get out but here's how I removed mine. First I removed all 4 bolts, (5mm hex key) then I dug around in my miscellaneous bolt box until I found some old and longer 6mm bolts to use in their place. At this point I threaded one in the middle hole only ( the bolt I used turned out to be about 2 inches long or about 50mm). I threaded in the bolt as far as it would go then cut a piece of wood to fit in the flat notch just below the pivot. Using a super bar, I hooked the head of the bolt and pressed against the block of wood until the pivot was withdrawn.
 |
Pressing against the block of wood, the pivot will withdraw. |
When the pivot was all the way out, I went ahead and removed the other pivot all the way. The only thing left holding the swing arm in place was the loose lower shock bolt. After removing the shock bolt, the rubber boot at the transmission needed to be helped to slide over the shaft universal joint so as not to be damaged. The swing arm could now be slid all the way off.
I felt this would be a good time to grease the drive shaft splines as the hard part was already done. To get the drive shaft off the splined shaft coming out of the transmission, I held it as straight as I could then gave it a sharp jerk straight back. Just forward of the universal joint, the drive shaft has a kind of locking clip (sort of like holding a socket on a ratchet) and by applying enough pressure (forward or back) the clip will open just enough to allow the shaft come off or lock it on. Now with the shaft in my hands, it was an easy job to apply BMW's own multi-purpose grease (yup, the red stuff) to all the splining surfaces (transmission, shaft and rear drive).
To get the shaft back onto the transmission splines, I just lined the splines up and gave the shaft a tap with a soft-faced hammer (sorry, the batteries in my camera went dead so no photos of the shaft).
I had a new swing arm to put on so I didn't mess with removing the old bearings from the original swing arm, instead I used new ones (FAG #539816A). I just used a standard bearing press to get the bearings in. The tricky part was having to reuse the lower silent block or shock bushing. I made a tool to remove the old shock bushing, then made another tool to press it into the new swing arm.
 |
The tool I made to press out the old shock bushing. |
To press the bushing back in, I started off with a bolt but soon changed over to a piece of all-thread.
 |
Pulling in the lower shock bushing. |
Last item to fit to the new swing arm was the drive shaft boot. The boot has two seams, they are at the top and bottom. I slipped the boot onto the swing arm and fit it's metal clip (after all, the clip is what holds the boot in place). I also smeared some grease around the lip of the boot that goes on the transmission flange. I then slid the shaft into the swing arm and lifted the swing arm into place. Slipped in the lower shock bolt (to hold it place) then pushed the boot onto the transmission flange. While the swing arm was held in place, I smeared a bit of grease on both swing arm pivots. Seeing as how the left side pivot was going to be the easiest, I lined it up with it's bearing and threaded it in about three turns. I then lined up the right side pivot and fit two long 6mm bolts to line up the threaded holes. To press the pivot in, I tapped on the center bolt with a soft-faced hammer until it was home.
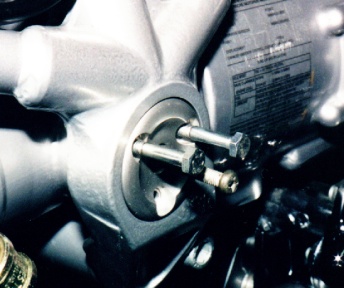 |
The right pivot after tapping home. |
After the pivot was home, I removed all the non-stock bolts and replaced them with the original bolts and tightened them. I then went back to the left pivot and turned in the pivot until I could just feel it slightly pressing against the bearing and left it there while tightening the locknut. Tapped in the cover for the left pivot and tightened the lower shock mount. I then refit the rear drive (no gasket or sealant required), caliper, sensors (with all the shims of course) and cable channel, finishing off with the wheel. Looked everything over and found it was time for a test ride.
Yup, these are pretty easy to work on!
Copyright © 2009 Pokie Parmidge