
1999 BMW R1200c
Tech Bike
January 11, 2007
For some time I've been looking for a bike to be used as a "Tech Bike", you know, one I can use a an example for technical and service articles. Fellow "Chromeheads" thought it would be a good idea to have such a bike (as I was wearing my own bike out with the constant taking apart and putting back together) to use on my web pages, so folks started donating money to help me buy such a bike. What I ended up with in December of 2006 is a bike off ebay,.... in South Dakota.
I won the bike at auction for $2800.00, all I had to do was go and get it. I checked several sites on the web to see how far it was to go and get the bike (from here in Loveland to Rapid City). The stated distance was listed as 240 miles (like I'm going to trust that again). A snow storm was treatening so I thought it would be a good idea to get out and get it done before the roads turned to ice. I left here in the mid-morning thinking I would get there with plenty of time to spare. As with all plans, the mileage was off by a fair amount. The distance ended up being 379 miles, so I arrived right at closeing time!
Hans, the owner, was very nice and stayed late allowing me time to secure the bike to the trailer and getting all the paper work done. The bike's front forks were off and the bike was wired to a pallet, I added some ties and secured both bike and pallet to the trailer. Coming with the bike were several loose parts that I stowed in the trunk of the little Subaru. Once I gave the "all done" signal, Hans turned out the parking lot lights and I rolled off into the dark. Thank goodness the drive home was uneventful, I arrived just after midnight.
The next day, unloading the trailer was pretty easy. I just backed it up to the garage, tilted the trailer up (squashing the license plate), and we were able to slide the pallet off. Once the pallet was on the floor, it wasn't any longer interested in moving. The pallet needed to be moved another foot and a half to get the door closed. A short search turned up the base of an old IV stand with four castors. I pried up the end of the pallet while my wife slid the edge of the IV stand under. The pallet slid so easily at this point that we almost didn't want to stop.
|
Tech bike
still on it's pallet. 1999 BMW R1200c |
A couple of weeks later, I was able to start figuring out how to get the teck bike off it's pallet and moveing around. I couldn't put it's forks back together as they were broken, yes, broken.
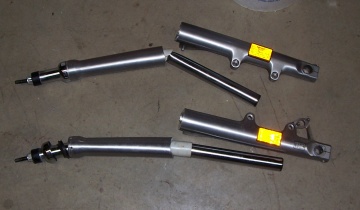 |
Tubes bent
and lower forks broken in half. Like I said,.... broken. |
Now, to get the tech bike off the pallet, it needed to be lifted. Lift up the bike and slide out the pallet but how to lift? My neighbor had just taken apart a music studio and gave me a number of 2x4 studs. I had just completed some work on my front porch which left me with a couple of 2x6's. Out came the come-along that I used to square up the old garage and I had just the right stuff to get the project done.
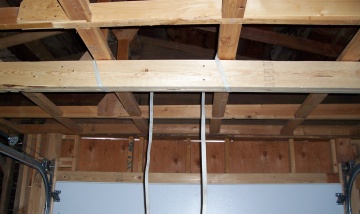 |
The laminated 2x6. |
I started off by strapping the laminated 2x6 to the ceiling joists, just to hold it in place. Then measured and cut 2x4's to fit in on either side (laminating two for each end). When the 2x4's were jammed in place and leveled, everything was screwed together. The headder was only screwed to the joists at the very ends to allow for bending in the middle. An old peice of chain was tossed over the top and latched to the come-along. Two loops of rope were used to secure the bike to the come-along.
 |
The lift ready for action. |
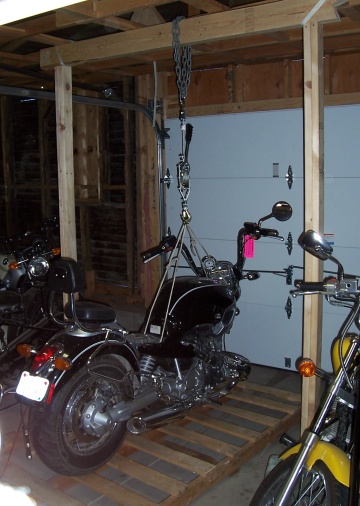
Up went the bike and out came the pallet. If it was any easier, someone else would have been doing it!
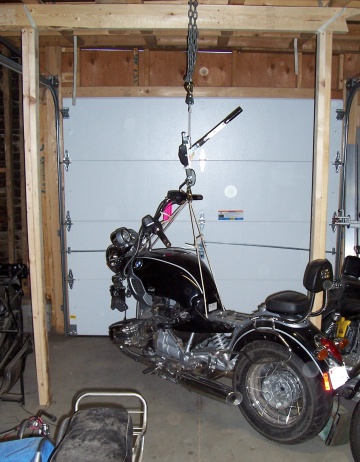 |
Pallet gone, just have to find a block to tuck under the motor. |
Once the pallet was out, I was able to set the bike back on the floor. Well, it's rear wheel anyway. I was able to find a chopping block that was just about the right height to set the motor on.
I've been needing to move the bike around as just having it hanging there is a real space problem, besides, I can't open the door as the gantry is in the way. I don't have the forks sorted yet so, I decided to make a dolly the bike could be pushed around on. I bought a couple of casters and thought to use some scrap pieces of metal I've got lyeing about.
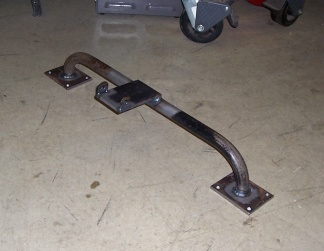 |
The start of the Dolly, I call it Madison. |
I've made the dolly to bolt up to the cross hole on the front of the engine case.
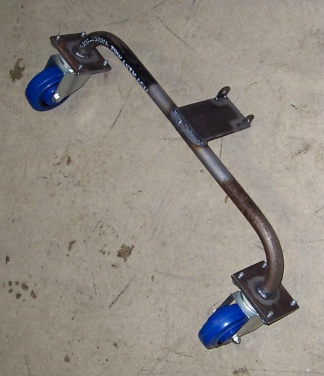 |
Madison with wheels bolted up. |
Next step was to see how Madison worked on the tech bike.
 |
Tech Bike with Madison attached. |
Madison keeps the bike upright just great! It's also set back just far enough that it's not very hard to lift the back of the bike to swing it into position.
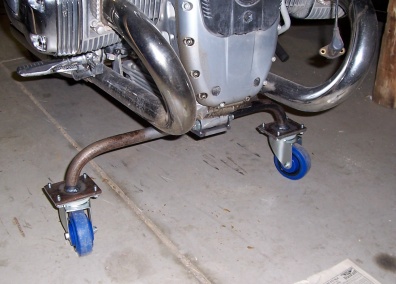 |
A close-up of the front, Madison is only held on with the one bolt in the engine cross hole. |
I had a set of used forks that I was hoping to use on the Tech Bike but, turns out they are bent beyond practical use, a set-back indeed. Beemer Boneyard had a fairly nice set, so, I bought them. They also had good, used front brake hose that could replace the original, leaky one. Not too long later I was able to secure a front wheel on eBay. Now I just need time to get it all together. Before the Tech Bike can be made "runable" a new battery will have to be secured, I have no idea how long it sat after it's accident but long enough for the battery to be of little value.
March 31, 2007. Today I started working on the Tech Bike's forks. The front swing arm is now in place and the shock is attached. The head light is now back where it should be and all is tight. I did find an odd thing though, the stem bolt (that holds the upper yoke in place) was loose. It's very unusual for this bolt to come loose as it is torqued and Lock Tite applied. Seems just a little worrysome. I went ahead and cranked it up tight but will have to torque it at a later date. I also changed out the leaking brake line, although the front brake can't be bled until the front wheel is back on.
 |
The Tech Bike with it's forks going together. |
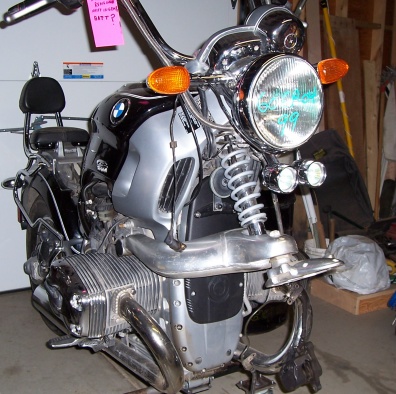
April 3, 2007. The front forks are now all buttoned up, front wheel on and sitting on the ground. I got the dolly off by jacking up both side of the bike from under the header pipes. Once the weight was off the dolly I just removed it. Lowering the bike was a bit tricky as I had to lower each side a little at a time until the tire was on the floor. The bike can't be ridden or considered complete until a few small parts have been added to the list. At first I thought I was going to have to do some body work to the front fender but when I put it on, the dent is mostly hidden by the cross-over brake line on the back of the fork brace. So, I decided to just leave it.
For some reason, the left chrome side panel came without any of the black plastic bits on it. A fellow Chromehead came to the rescue with a panel that had skidded down the road to donate. I stripped all the plastic pieces off and fitted them to the one I had, now complete. The shims and two mounting bolts for the ABS sensor didn't come with the bike, so those are some of the bits that are now on order.
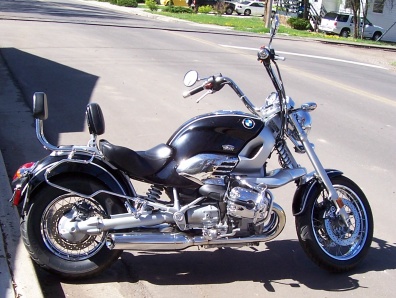 |
The finished Tech Bike |
Then one from the front,....
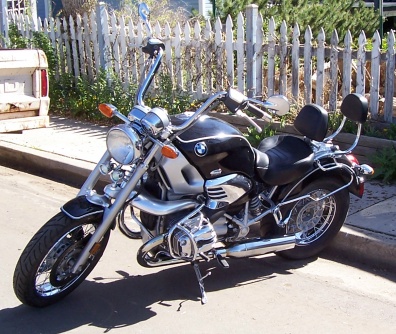 |
Again, the
finished Tech Bike Ready to be "used" |
April 16, 2007. All parts have been secured and have now been assembled onto the Tech Bike. There are still a few things I would like to do to the Tech Bike but I consider them just "extras" and consider the Tech Bike complete. I have yet to ride the Tech Bike but I'm guessing that will come in time.
Copyright © 2009 Pokie Parmidge